Reasons for my absent in blogging these days is I had a fever lasting for weeks. No, nothing extremely serious that needs medication but it is kinda serious enough to get me all excited and crazy: I have been caught by No Knead Bread fever. I better warn you first … it is very addictive. I made them just for the pleasure of seeing my dough ferment correctly and rise and each time my bread turned out successfully, I wanted to do it again. My mother-in-law is thrilled about my latest baking adventure whereas hubby is a bit weary of my latest addiction. He asked one day ‘how many dough are you making this time around?’ after seeing bowls of dough fermenting everywhere in the house. 😁
No Knead Bread is nothing new to bloggers around the world. It has been circulating for a few years now but now and then, there is a renewed interest in this method for beginners at bread making. This recipe, created by Jim Lahey of Sullivan Street Bakery, was first published in The New York Times in November 2006.
Mind you, my first few attempts at making this bread was a total disaster. The 1st didn’t rise that much – I convinced myself that it did doubled in size (who was I bluffing ?) and baked it at 180°C for 45 minutes as said as an alternative way of baking it if one doesn’t have a dutch oven. The bread was decent looking but very compact, didn’t rise completely and crumbly, didn’t taste anything like a whole wheat bread at all. I didn’t understand why my whole wheat bread was so crumbly. My other half seemed to be satisfied with it while I was so totally disappointed. Never mind, I was not going to be defeated so easily: I got another brand of yeast from the cupboard, made my 2nd dough. To my utter disappointment, it didn’t even rise as high as my 1st attempt. And baking it, turned into something hard as a rock (I think one could kill someone with it). The inside totally didn’t rise and it looked totally inedible – my better half was courageous enough to try it and said it tasted like compact flour. 😛
I was determined to find out why and where I failed… spent a few hours reading up on the Internet for possible causes. Ah, maybe my yeast was old – that could be the reason or my kitchen isn’t warm enough or I didn’t bake it right. A quick check on the date of my two packets of yeast revealed they were both expired by respectively 1 and 3 years: no wonder my dough didn’t rise as it should! Got my cheri to get a new pack for me and I went off making a new batch of dough. The next morning I excitedly went to check on my dough, again my dough had not risen that much. As we were going to my in-law’s place for the week-end, I decided to take the dough with me and left it to rise in the furnace room since that’s the warmest place in the house. Off it went sitting there for a night. Wow! What a difference it made – it really doubled in size. I was elated. Yes! yes! I was going to have my beautiful bread! Kept telling myself not to be too excited in case it was another failure. So I let the dough to proof in the boiler room for 2 hours. Once the time is up, I pop it in the oven. This time around, I used the dutch oven method – using a Pyrex pot. Everyone was impatiently waiting for my bread for lunch. I took one look at my finished bread and was excited like a little kid given a candy: the bread was truly beautiful and it sang for everyone at the table. No, they couldn’t wait for an hour for it to cool down so they cut it right away.
Oh… the reason why my whole wheat bread doesn’t taste anything like it is because I got lost in translation. I used sarrasin (buckwheat) flour instead of blé complet (whole wheat). Two completely different flour. duh!
Watch out for my coming post on alternative methods of baking this bread if you don’t have a dutch oven. I did various experiments on it.
No Knead Bread Adventure
Ingredients
- 3 cups plain flour
- 2 tsp salt
- 1/4 tsp instant yeast
- 1 1/2 cups lukewarm water
Directions
- In a big bowl, mix flour, yeast and salt together (stir to mix it).
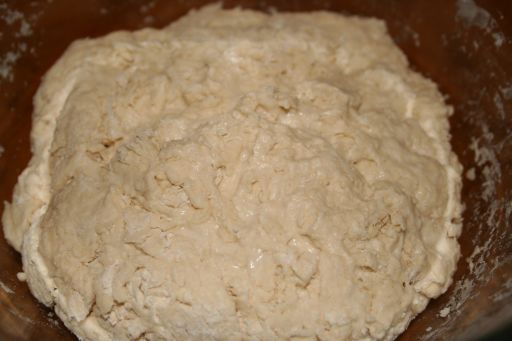
- Pour in the water and mix it till it comes together. It should have a ‘shaggy’ look (sort of dry and a bit wet here and there).
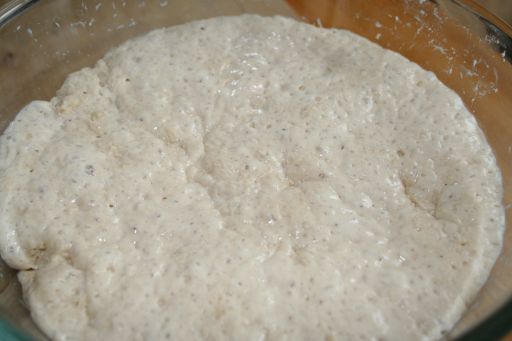
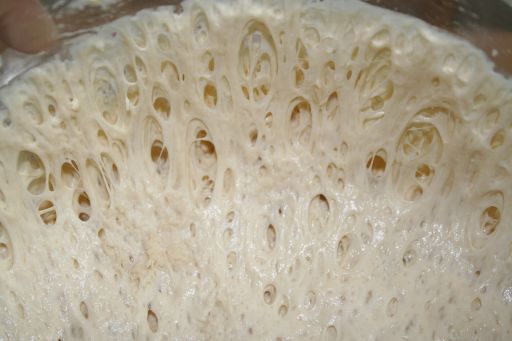
- Cover the bowl with a plastic wrap and leave it in a warm room (21°C or 70°F) to let the dough rise for 12 hours. You can leave it longer if you want. The dough should double after 12 hours and look wet with lots of bubbles on the surface.
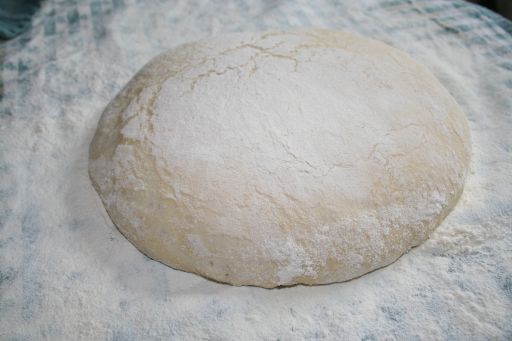
- Generously flour a cotton cloth or a clean dish cloth, tipping the bowl, using a rubber spatula scrape the dough out of the bowl – it will be sticky and stringy – onto the cloth. Sprinkle some flour on top of the dough. Flour your hands as well.
- Fold the dough over lapping each other like a cross. It will look like a square or rectangle. You can either flip it the fold top face down onto the towel or you can pick it up with your hands and pull it into a circle and drop the tucked bottoms onto the towel with the round smooth surface facing up.
- Fold or drap the cloth/towel to cover the dough and let it proof or rise for the next 1 or 2 hours at room temperature. It should double in size. U can let it rise longer if u wish.
- Half-hour before dough is ready, heat oven to 230°C(450°F). Put a heavy covered pot (cast iron, enamel, Pyrex or ceramic) in oven as it heats. When dough is ready, carefully remove pot from oven. Slide your hand underneath the dough (under the cloth) and tip it over into pot (the bottoms of the dough should be facing up). Don’t worry if it is a mess. Shake pan once or twice if dough is unevenly distributed; it will straighten out as it bakes.
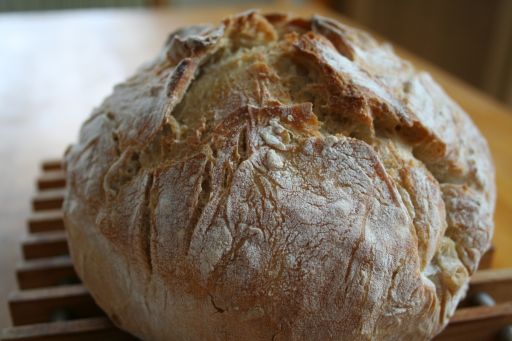
- Cover with lid and bake for 30 minutes, then remove lid and bake another 15 minutes until loaf is beautifully browned. Cool on a rack. You can hear the bread crackles.
- Leave the bread to cool totally before cutting it as it is very hot inside (like for an hour or so).
The Verdict
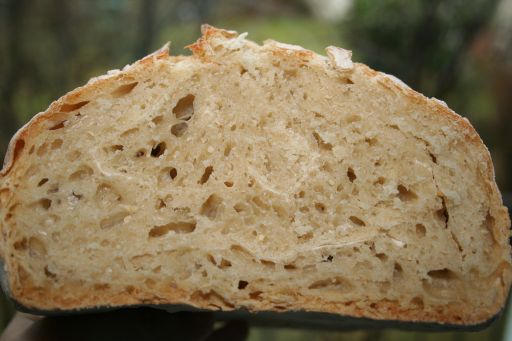
It smells awesome, crusty on the outside, soft, moist, somewhat dense and deliciously tasty on the inside. Everyone loves it, even my guests (who asked me for the recipe). My mom-in-law who is very critical about her bread, gave this bread a big thumbs up. My father-in-law loves the walnut bread version. It is so delicious with just butter or with raspberry or strawberry jam.
The bread stays fresh even after the 3rd day. To keep it fresh, cover the cut portion with aluminum foil. Do not cover the whole bread as it will cause the crusty surface of the bread to go soft.
Give your bread new varieties by adding walnuts, dried tomatoes, olives, sesame seeds, pine nuts or a mixture of nuts, oats and raisins, dried figs, small chunks of bacon, etc. Instead of white bread, mix a cup of whole wheat flour with 2 cups of plain flour, or add rye.
Notes
It is said that the longer you let the dough rest like for 18 – 24 hours, the tastier is the bread. You can stir the dough down and let it rise again if you aren’t baking it then. I did also let it proof in the fridge because I realised I didn’t have time to bake it then. When I was ready to bake it, I took it out and let it proof at room temperature before baking it.
Problems with Dough
If your dough didn’t rise, it could be either that your yeast is too old or the room temperature is not warm enough.
Kitchen too cool during winter?
My kitchen is a bit cool, so I had problem getting my dough to rise within 12 hours. If you can wait longer, then let your dough sit longer till it doubles in size.
Alternatively, I place my dough in my small bathroom next to the heater with door closed. Or, I put it in my oven or my microwave oven (both on turn-off mode, of course). This method works perfectly 🙂. Problem solved.
Messy dough on towel
The original recipe put dough on towel … frankly, I only succeeded 1 time using this method with towel coming off clean after proofing. Perhaps the air was drier up in the mountains?? I’m not sure. For the rest of the breads I made, the dough always got stuck to the towel and I had to literally scrape it off. So alternatively I generously flour a baking sheet and let the dough proof on it. It is less messy and we can throw away the paper later. The other type of baking sheet I use is a non-stick reusable baking sheet. The dough still gets stuck on some parts but getting the dough off the mat is not that difficult.