Deprecated: Using null as an array offset is deprecated, use an empty string instead in /var/www/cookingninja.com/wordpress/wp-includes/class-wp-block-type-registry.php on line 168
Deprecated: Using null as an array offset is deprecated, use an empty string instead in /var/www/cookingninja.com/wordpress/wp-includes/class-wp-block-type-registry.php on line 168
Deprecated: Using null as an array offset is deprecated, use an empty string instead in /var/www/cookingninja.com/wordpress/wp-includes/class-wp-block-type-registry.php on line 168
Deprecated: Using null as an array offset is deprecated, use an empty string instead in /var/www/cookingninja.com/wordpress/wp-includes/class-wp-block-type-registry.php on line 168
Deprecated: Using null as an array offset is deprecated, use an empty string instead in /var/www/cookingninja.com/wordpress/wp-includes/class-wp-block.php on line 295
Deprecated: Using null as an array offset is deprecated, use an empty string instead in /var/www/cookingninja.com/wordpress/wp-includes/class-wp-block-type-registry.php on line 168
Deprecated: Using null as an array offset is deprecated, use an empty string instead in /var/www/cookingninja.com/wordpress/wp-includes/class-wp-block-type-registry.php on line 168
Deprecated: Using null as an array offset is deprecated, use an empty string instead in /var/www/cookingninja.com/wordpress/wp-includes/class-wp-block-type-registry.php on line 168
Deprecated: Using null as an array offset is deprecated, use an empty string instead in /var/www/cookingninja.com/wordpress/wp-includes/class-wp-block-type-registry.php on line 168
Deprecated: Using null as an array offset is deprecated, use an empty string instead in /var/www/cookingninja.com/wordpress/wp-includes/class-wp-block-type-registry.php on line 168
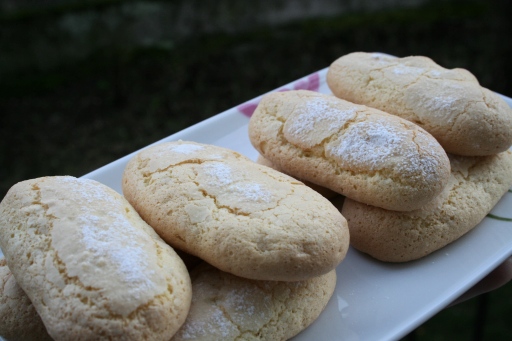
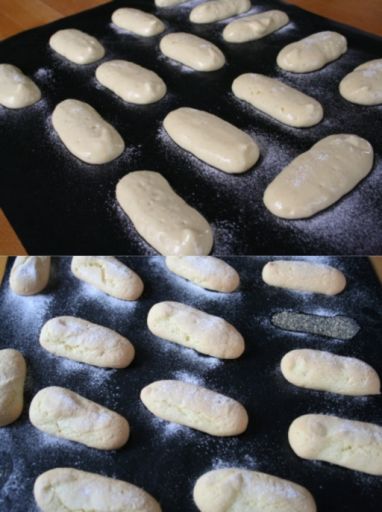
The other not-so-secret ingredient needed for making Tiramisu (Daring Bakers’ February Challenge by Deeba of Passionate About Baking & Aparna of My Diverse Kitchen) is home made Sponge Fingers, alternatively known as Ladyfingers or Savoiardi biscuits. It’s a very simple and straight forward recipe to do. Nothing to be afraid of except maybe if you are afraid you can’t get your whites to stiff peaks. A little dash of salt in your whites before you whip will do the trick. One of the little problems I encountered was controlling the batter coming out of my ziploc piping bag. I’m not very skilled at piping my batter yet. LOL! The other is that my sponge fingers were baked earlier than the time indicated. So do watch your Savoiardi biscuits in the oven. Other than that, making these biscuits is a breeze.
The other thing I want to draw your attention to is CAKE FLOUR is not self-rising flour. Do not confuse these two. Self rising flour (known as farine à gateaux in France) has baking powder in it whereas Cake Flour has none – contains only plain flour & some corn starch/corn flour.
Ladyfingers (Spong Fingers or Savoiardi Biscuits)
(taken from Cordon Bleu At Home)
Makes: approx 24 big ladyfingers
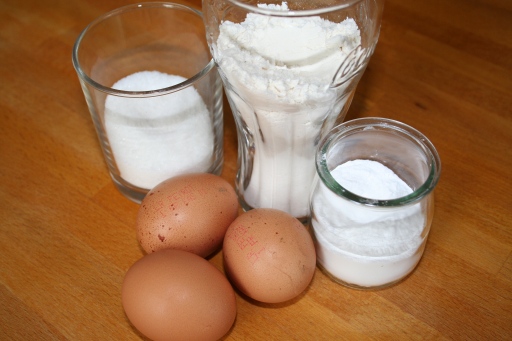
Ingredients
- 3 eggs, separated
- 75 g granulated sugar
- 95 g cake flour, sifted (or ¾ cup plain flour + 2 tbsp cornflour or corn starch)
- 50 g icing sugar or confectioner’s sugar
Directions
- Preheat your oven to 175°C (350 F – gas mark 4).
- Lightly brush 2 baking sheets with oil or softened butter and line it on the baking tray.
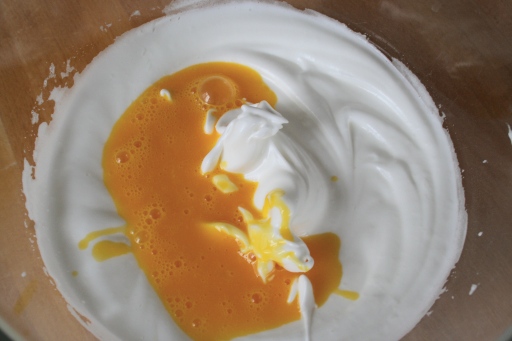
- Beat the egg whites using a hand held electric mixer until stiff peaks form.
- Gradually add granulate sugar and continue beating until the egg whites become stiff again, glossy and smooth.
- In a small bowl, beat the egg yolks lightly with a fork (so that we can easily incorporate the yolks into the whites) Fold the lightly beaten egg yolks into the meringue, using a wooden spoon.
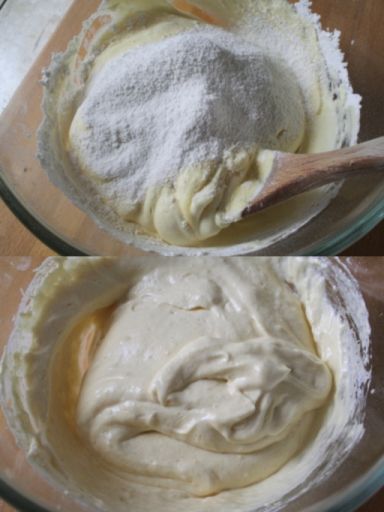
- Sift the flour over this mixture and fold gently until just mixed. It is important to fold very gently and not overdo the folding. Otherwise the batter would deflate and lose volume resulting in ladyfingers which are flat and not spongy.
- Fit a pastry bag with a plain tip (or just snip the end off; you could also use a Ziploc bag) and fill with the batter. Pipe the batter into 5″ long and 3/4″ wide strips leaving about 1″ space in between the strips.
- Sprinkle half the confectioner’s sugar over the ladyfingers and wait for 5 minutes. The sugar will pearl or look wet and glisten. Now sprinkle the remaining sugar. This helps to give the ladyfingers their characteristic crispness.
- Bake the ladyfingers for 10 minutes, then rotate the sheets and bake for another 5 minutes or so until the puff up, turn lightly golden brown and are still soft.
- Allow them to cool slightly on the sheets for about 5 minutes and then remove the ladyfingers from the baking sheet with a metal spatula while still hot, and cool on a rack.
- Store them in an airtight container till required. They should keep for 2 to 3 weeks.
The Verdict
My sponge fingers turned out beautifully. It’s very soft and spongy on the inside but not crunchy on the outside like it should be. Maybe it’s because I didn’t sprinkle all the icing sugar on top as indicated. (I only used ¼ of the quantity stated) The ladyfingers taste kinda flat/bland but tasty all the same. It’s very eggy – reminds me of Chinese New Year cookies Kueh Bolu. I like to dip mine with tea. I’ll definitely add vanilla extract or other flavours when I made these fingers again.
Notes
My ladyfingers are baked way before the indicated time in the recipe. Perhaps I made them smaller or maybe my oven is hotter. Anyway do keep a watch out on your sponge fingers, if it’s lightly brown on top and springy to touch before the time is up, you should take it out.