For February, Daring Bakers’ host Deeba of Passionate About Baking & Aparna of My Diverse Kitchen chose Tiramisu as the challenge of the month based on recipes from The Washington Post, Cordon Bleu at Home and Baking Obsession.
Et bien sûr, nothing is ever simple with Daring Bakers’ (hence the name sake), this time around, we aren’t taking the easy road like I did with my first Tiramisu in 2007 where everything was store bought and put together. The challenge is to make our own mascarpone cheese and our sponge fingers/ladyfinger biscuits, pastry cream and zabaglione (a cooked one) and piece it all together to make this pick me up dessert.
So what is this famous Tiramisu? As mentioned in my older post, it means “pick-me-up” (metaphorically, “make me happy”) made of mascarpone cheese, sponge fingers or savoiardi & zabaglione.
When I first read what is needed to be done for this challenge, I nearly fainted on the spot. I assure you would too when you read the following list. But fear not, it’s not as complicated and difficult as it looks. Once I got started, I got into the swing of things very fast and all jazzed up… all too soon, the fun ended and I felt a bit bereaved that it ended so fast.
Making pastry cream was a breeze since I have made it before for a Blueberry Tart last year. However I was unsure how a zabaglione should look like after it is done so I just relied on my ninja chef instinct.
For this challenge, I have split things into 3 posts for easy reference :
- Home-made Mascarpone Cheese (make this 1 day in advance)
- Home-made Spong Fingers, also known as Ladyfingers biscuits & Savoiardi (can be made on the day itself or a few days in advance)
- Assembling Tiramisu (below)
As we are making all of it from scratch, it’s easier and less stressful if you make the sponge fingers first and mascarpone cheese, zabaglione & pastry cream another day or vise versa. Then assemble the tiramisu the following day. The mascarpone cheese needs to be refrigerated overnight while the zabaglione & pastry cream need to be refrigerated for at least 4 hours. Are you still with me after reading the long list of things to be done? OK, whenever you are ready, I’m ready. Let’s go!
Tiramisu (made from scratch)
(Recipe source: Carminantonio’s Tiramisu from The Washington Post, July 11 2007)
Serves: 6
Ingredients
For the zabaglione
- 2 large egg yolks (I used 3 medium egg yolks)
- 50 g sugar
- 60ml Marsala wine (or port or coffee)
- ¼ tsp vanilla extract
- ½ tsp grated lemon zest (finely)
For the vanilla pastry cream
- 55 g sugar
- 1 tbsp all purpose flour
- ½ grated lemon zest (finely)
- 1/2 tsp vanilla extract
- 1 large egg yolk (I used 1 medium egg)
- 175 ml whole milk (I used partially skim milk)
For the whipped cream
- 235ml chilled heavy cream (I used UHT 35% crème liquide)
- 55gms sugar
- ½ tsp vanilla extract
To assemble the tiramisu
- 1 big cup brewed espresso, warmed
- 1 tsp rum extract or (optional)
- 110gms sugar (I left it out)
- 75 g mascarpone cheese
- 36 savoiardi/ ladyfinger biscuits (you may use less)
- 2 tbsp unsweetened cocoa powder
Directions
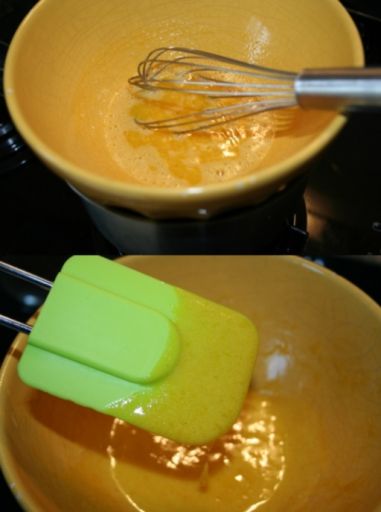
For the zabaglione
- Heat water in a double boiler or a bain-marie.
- In a large mixing bowl (or stainless steel mixing bowl), mix together the egg yolks, sugar, the Marsala (or espresso/ coffee), vanilla extract and lemon zest. Whisk together until the yolks are fully blended and the mixture looks smooth.
- Transfer the mixture to the top of a double boiler or the bain-marie. Cook the egg mixture over low heat, stirring constantly, for about 8 minutes or until it resembles thick custard. It may bubble a bit as it reaches that consistency.
- Let it cool to room temperature and transfer the zabaglione to a bowl. Cover and refrigerate at least 4 hours or overnight, until thoroughly chilled.
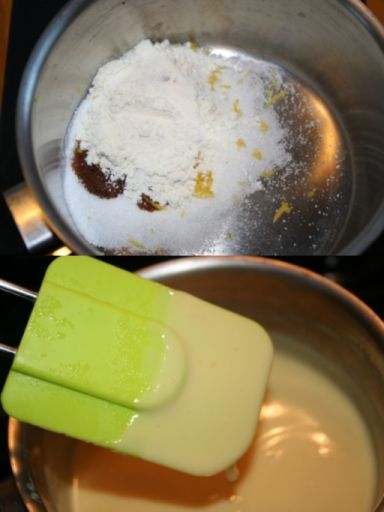
For the pastry cream
- Mix together the sugar, flour, lemon zest and vanilla extract in a medium heavy-bottomed saucepan.
- Add in the egg yolk and pour in half of the milk slowly while whisking it. Whisk until smooth.
- Place the saucepan over low heat and cook, stirring constantly to prevent the mixture from curdling.
- Add the remaining milk a little at a time, still stirring constantly. After about 12 minutes the mixture will be thick, free of lumps and beginning to bubble. (If you have a few lumps, don’t worry. You can push the cream through a fine-mesh strainer.)
- Transfer the pastry cream to a bowl and cool to room temperature. Cover with plastic film and refrigerate at least 4 hours or overnight, until thoroughly chilled.
For the whipped cream
- Place the bowl (in which cream is to be whipped) and the beaters of the hand held electric mixer in the fridge for about ½ to 1 hour before hand helps to whip up the cream whip very well.
- Combine the cream, sugar and vanilla extract in a mixing bowl.
- Beat with an electric hand mixer or immersion blender until the mixture holds stiff peaks. Set aside.
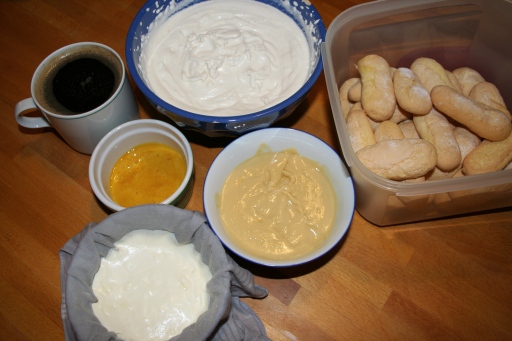
To assemble the tiramisu
- Have ready a rectangular serving dish (about 8″ by 8″ should do) or one of your choice.
- Mix together the warm espresso, rum extract and sugar (I left out this in mine) in a shallow dish, whisking to mix well. Set aside to cool.
- In a large bowl, beat the mascarpone cheese with a spoon to break down the lumps and make it smooth. This will make it easier to fold.
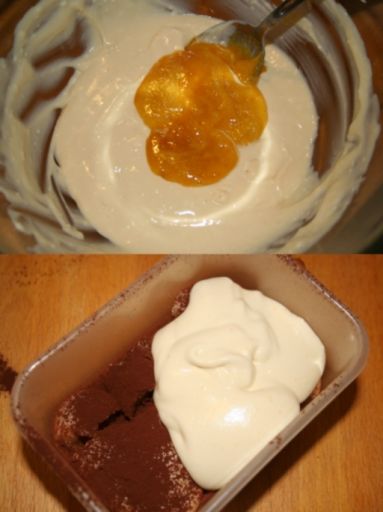
- Add the prepared and chilled zabaglione and pastry cream, blending until just combined.
- Gently fold in the whipped cream. Set this cream mixture aside.
- Dip 12 of the ladyfingers in the sweetened espresso, about 1 second per side. They should be moist but not soggy.
- Line the ladyfinger on the dish, placing them side by side in a single row. You may break a lady finger into two, if necessary, to ensure the base of your dish is completely covered. (I sprinkle cocoa powder on top of every layer of spong fingers)
- Spoon one-third of the cream mixture on top of the ladyfingers, then use a rubber spatula or spreading knife to cover the top evenly, all the way to the edges.
- Repeat to create 2 more layers, using 12 ladyfingers and the cream mixture for each layer.
- Clean any spilled cream mixture; cover carefully with plastic wrap and refrigerate the tiramisu overnight.
- To serve, carefully remove the plastic wrap and sprinkle cocoa powder using a fine-mesh strainer or decorate as you please on the surface of the tiramisu. Cut into individual portions and serve.
- The Tiramisu can be kept refrigerated for 2-3 days. Once assembled, it can be frozen till you need to serve it, in case you are not serving it immediately.
The Verdict
It’s great! Very creamy and sinful but surprisingly it didn’t taste as sweet as I expected it to be. There’s not an incredible difference with the one made with your off-the-shelf ingredients, but this one is a bit more subtle and flavourful.
The next time I make Tiramisu, I wouldn’t hesitate to make my own sponge fingers (ladyfingers) and mascarpone at home, but assemble it using the simpler version ie. make it with raw egg yolks and whipped egg whites. However if you or one of your guests is pregnant or has aversion about eating raw eggs, I would recommend making tiramisu using above methods with zabaglione and whipped cream.
Update: We defrozed one of the tiramisu totally the other day and found that it indeed tasted a little bit sweeter than usual. I have also just realized that I added all the mascarpone (180 g) I made in my tiramisu instead of the 75 g as required in the recipe. So if you are making this version, please reduce the quantity of sugar indicated in zabaglione and pastry cream or else your tiramisu will turn out to be very sweet.
Notes
Placing the bowl (in which cream is to be whipped) and the beaters of the hand held electric mixer in the fridge for about ½ to 1 hour before hand helps to whip up the cream whip very well.
As there were already sugar in pastry cream and zabaglione, I omitted sugar in the coffee as I didn’t want the tiramisu to be too sweet.
You can assemble the tiramisu in wine glass, cups or verrines as you wish. Leave it to creativity and imagination. Obviously a transparent container will show it’s layered structure better![]()
