Deprecated: Using null as an array offset is deprecated, use an empty string instead in /var/www/cookingninja.com/wordpress/wp-includes/class-wp-block-type-registry.php on line 168
Deprecated: Using null as an array offset is deprecated, use an empty string instead in /var/www/cookingninja.com/wordpress/wp-includes/class-wp-block-type-registry.php on line 168
Deprecated: Using null as an array offset is deprecated, use an empty string instead in /var/www/cookingninja.com/wordpress/wp-includes/class-wp-block-type-registry.php on line 168
Deprecated: Using null as an array offset is deprecated, use an empty string instead in /var/www/cookingninja.com/wordpress/wp-includes/class-wp-block-type-registry.php on line 168
Deprecated: Using null as an array offset is deprecated, use an empty string instead in /var/www/cookingninja.com/wordpress/wp-includes/class-wp-block.php on line 295
Deprecated: Using null as an array offset is deprecated, use an empty string instead in /var/www/cookingninja.com/wordpress/wp-includes/class-wp-block-type-registry.php on line 168
Deprecated: Using null as an array offset is deprecated, use an empty string instead in /var/www/cookingninja.com/wordpress/wp-includes/class-wp-block-type-registry.php on line 168
Deprecated: Using null as an array offset is deprecated, use an empty string instead in /var/www/cookingninja.com/wordpress/wp-includes/class-wp-block-type-registry.php on line 168
Deprecated: Using null as an array offset is deprecated, use an empty string instead in /var/www/cookingninja.com/wordpress/wp-includes/class-wp-block-type-registry.php on line 168
Deprecated: Using null as an array offset is deprecated, use an empty string instead in /var/www/cookingninja.com/wordpress/wp-includes/class-wp-block-type-registry.php on line 168
When I was growing up, I never had any yogurt, didn’t know what it was nor taste like till I saw my elder sis giving it to my nephew (when he was little). Yes, yes… call me mountain tortoise (singlish equivalent to a country pumpkin)… then again, I did grew up in the countryside 😛. Anyway, ever since I started living in France, I see yoghurt of every imaginable kind in the cold section and I mean a really really wide range of it and they even have sections especially for kids alone. :0 (OK, note to self: I have to stop yapping like an ignorant idiot) I even started to like the flavoured ones – quite tasty actually – but I haven’t quite acquired the taste for plain yogurt yet … until I made my own. To me, the plain ones are just too sour for my taste. On the other hand, my in-laws and little one are big fans of plain yoghurt. 🙂
Two years ago we got Michèle (my mom-in-law) a yoghurt maker, much to her delight and she did put it to use straight away. However, after they moved to another city, she never quite managed to get her yoghurt right like she did in Nantes. She tried it in Paris – it didn’t work. Tried it at my house, didn’t work too. She tried several times using different quality of milk (even to the extend of getting fresh milk direct from the local farm) and putting it at different location in her house – didn’t work too. She finally gave up and retired her yoghurt machine. Funnily, all this got me very intrigued by this yoghurt making business 😛. To be honest, I was kinda peeved on Michèle’s behalf that all her persistent attempts to get her beautiful yoghurt failed. I was determined to prove it can work. There I set out to find out how to make my own yoghurt using the most simple stuff that you can find at home. The most exciting part of this experiment is that it really does works 🙂. You should have seen me jumping up and down like a crazy woman early in the morning shouting ‘It works. It works, honey. I can’t believe it, I have yoghurts.’ This went on and off for the next few hours. Hahaha!
Now before we get to the recipe, let’s have a look at why yoghurt is good for us :
- It is rich in protein, calcium, phosphorus, riboflavin, vitamin B6, B5 & B12, zinc and potassium. This alone should entice us to consume yoghurt daily. 🙂
- It is said that yogurt helps boost one’s immunity system, promotes healthy gums, lowers cholesterol (LDL) and help to prevent vaginal yeast infections (note that the study is not conclusive on this). Some even claim it helps prevent bad breathe and burn fats (although these claims sound somewhat fishy).
The great thing about making your own yoghurt is you can be sure that there isn’t any preservatives, artificial colors or flavorings in them unless you add some flavours yourself. It is also cheaper than buying it at the supermarket. Lastly I feel they just taste better.
Making yoghurt is basically growing specific bacteria (hence why we need a yogurt to produce more yogurt). There are many different ways of incubating your yogurt but I chose this method because it’s the simplest, hassle free and all the apparatus needed in this process making are easily found in your own home.
Disclaimer: I in no way claim to be health nor yoghurt expert. The below steps are what I gathered and learned from sources on the Internet. I have made yoghurt using these steps a few times with success and my family suffers no unwanted effects from it, however you should know that since the process of making yoghurt involves growing bacteria, it carries some risks.
Home-Made Yogurt
Ingredients
- 1 litre full cream milk (fresh or long-life)
- 1 plain (125 ml) yoghurt with active yogurt cultures (as a starter and get a good one)
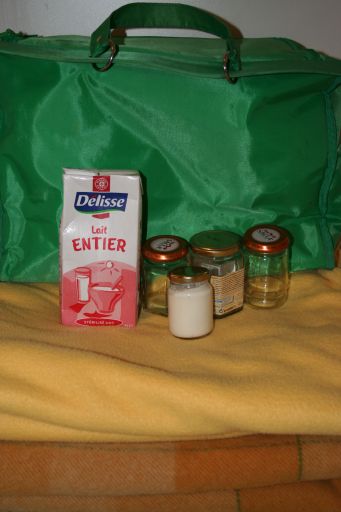
- 1 big cooler bag/box or Styrofoam box
- 2 thick blankets (like comforter or thick wool blanket)
- some jam bottles or any small bottles with caps
- a whisk
Directions
- Lay the woolen blanket in the cool bag or box in such a way that you can fold it in later.
- Take the tub of yoghurt bought from store out of the fridge and let it warms up to room temperature.
- Set out all the bottles on the table.
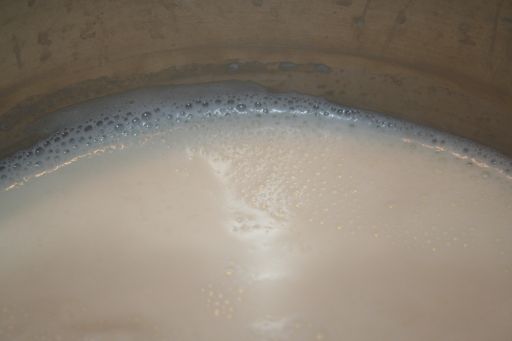
- Pour milk in a big pan, heat milk at medium heat to scald it (just below the boiling point). Stir it once in a while to prevent it from sticking the bottom of the pan. It is scald when you see foams (bubbles) forming around the rim of the pot and milk starts to rise. Once you see the milk rising (without boiling), turn off the fire. We scald the milk to kill other bacteria that might be present in the milk that would compete against the bacteria that convert milk to yogurt.
- Cool the milk in a sink filled with cold water (helps to cool it down faster) while continue stirring the milk now and then. Once it reaches the temperature of a baby bottle (lukewarm) – you can test it with your little finger. Take it out of the sink.
- While the milk cools down, pour boiling water (I used the kettle boiled water) into each jar to sterilized it.
- Add in the room temperature yoghurt to the milk and give it a thorough stir making sure that it is well blended into the milk. I use a whisk for this.
- Once the yoghurt mixture is ready, throw out the hot water in the jars, using a soup scoop, pour it into the individual jars and cap it.
- Place all the jars inside the prepared cool bag/box, fold the blanket in, covering the jars. Cover the box, in my case, I zip it up. 🙂
- Place it in a warm place with another blanket over your box. Leave it for up till 9 – 11 hours undisturbed – no shaking, no vibration to the box.
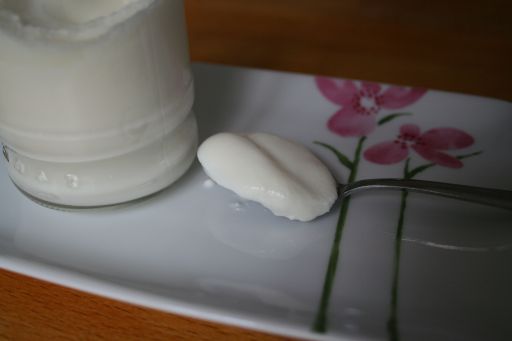
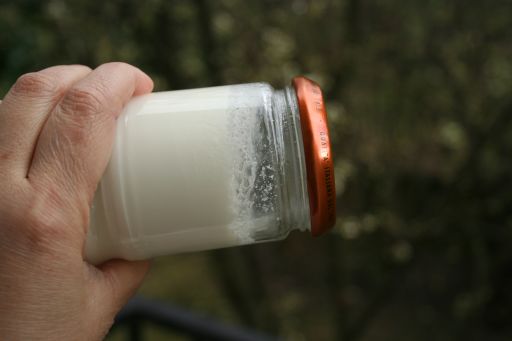
- After 9 – 11 hours, yoghurt should be firm. Delicately take one out without disturbing the rest, tilt it gently to see if the yoghurt keeps in shape. If the yogurt is set and firm, chill it for a few hours before enjoying it . They will last for about 2 weeks. You can use one of these yoghurts as a starter of your next batch, but you have to use it within 5 – 7 days.
Making Yogurt in Tropical Climate
- Follow above instructions 2) to 8).
- Leave the bottled yogurt undisturbed in an oven or microwave oven (switched off, of course) for 5 – 8 hours. (Alternatively, you can leave your yougurt on the table for the whole day.)
- By then, yoghurt should be firm. Delicately take one out without disturbing the rest, tilt it gently to see if the yoghurt keeps in shape. If not, leave it longer. If the yogurt is set and firm, chill it for a few hours before enjoying it.

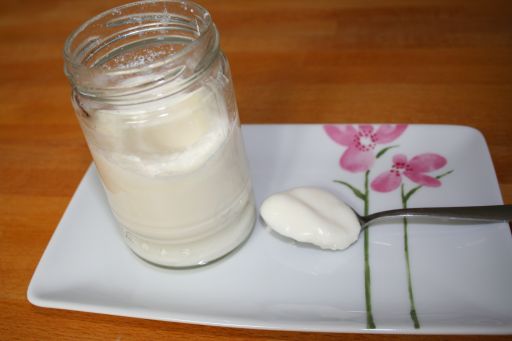
The Verdict
The texture is very rich, smooth and creamy like a smoothie. It tastes just right – mild, not too acid. I simply love it. Normally I don’t eat yoghurt at all because I find them too sour for me, but the home-made version has really converted me. It is delicious on it’s own or savour it with fresh fruits, some nuts, jam, or cereals etc.
You can alternatively put some jams or syrup at the bottom of the jar before filling it up with the yoghurt mixture.
Notes
For those who are using a thermometer, the milk should heated up to 82°C (180°F) – beyond this temperature, you’ll scorched your yoghurt giving you a bad taste. Once it reaches this temperature, remove it from the heat and let it cool down to 40°C (105°F ). Follow the above steps as usual.
As my kitchen is rather cold, I place my covered cooler bag next to my kitchen heater. Mine took about 11 hours to set and firm up. If your place is warm, then probably you can leave the cooler box uncovered and your yoghurt might only need 9 hours to set.
Some yoghurt recipes add milk powder to make the yogurt thicker. I don’t use it. I like the way how this yogurt turns out as in the texture and taste. It is said that the longer you leave the yogurt to incubate, the more acid/sour it tastes.
The issue of yoghurt not thickening
There are several reasons why your yoghurt didn’t set, here are the possible reasons:
- Your milk is too hot or too cold when you add in your yoghurt starter to the mixture.
- The incubation temperature might be too low or too hot. If it is too low, leave it to incubate longer.
- While incubating, the box was moved or disturbed. Make sure that there is no vibration. It must not be disturbed.
- The starter is too old or inactive. Could try another brand of yogurt making sure that it contains live active cultures.